Don't forget to visit my Etsy shop to see more of my work!

Friday, November 6, 2015

A Layout and a Few Cards with Kiwi Lane

Hello fellow Kiwi Lane fans!  I have a few things to share with you today. And to continue with my theme from some of the last few posts I've done, I used another fabulous Kiwi Lane paper kit to create a single page layout and a few cards, along with this month featured templates- Brackets, Adorn and Autumn.

I used Kiwi Lane's "Social Butterfly" paper kit this month. I have to admit- when I saw this collection, I thought it was going to be way too girly for me to do use very well.  Especially with the Autumn template set.  I mean, it has pink, flowers and butterflies!  BUT, I should have known better!! These Kiwi Lane ladies are genius and know how to make a paper kit so that you don't have to use the girly elements in a way that overpowers the page. Instead, you use the reverse side and smaller pieces of those prints that scream GIRLY GIRL.  And you end up with a project that is just feminine enough without jumping out at you with a tiara, tutu and sparkly wand. I'm telling you, it's pure genius!!

So here's the layout I ended up with:
Supplies: Kiwi Lane's Social Butterfly paper kit; alphabet stickers (American Crafts, Making Memories); ink (Ranger); pen (Staedtler)

And here's how I "Framed" my layout:


Yes, that is a grand total of three templates on my layout.  I had no idea what I wanted to do with the layout when I started.  So I threw on a few templates from the Adorn template set, along with a template from the Bracket set and built my page from there. I added lots of layers of the scalloped edge and mirrored that at the bottom of the page.  I also used one of the printed quotes from the paper kit and added that early on to make sure I left room for it.  I finished off the page with a butterfly from the Tiny Nature set and a few flowers from the Tiny Wildflower set and a title using some alphabet stickers.  

With some of the remaining paper from the kit, I made some cards:
Supplies: Kiwi Lane's Social Butterfly paper kit; card stock (American Crafts); pen (Staedtler); ink (Ranger); stamp (Basic Grey); jewels (craft supply)
 Supplies: Kiwi Lane's Social Butterfly paper kit; card stock (American Crafts); pearl (Doodlebug); brad (American Crafts); ink (Ranger)
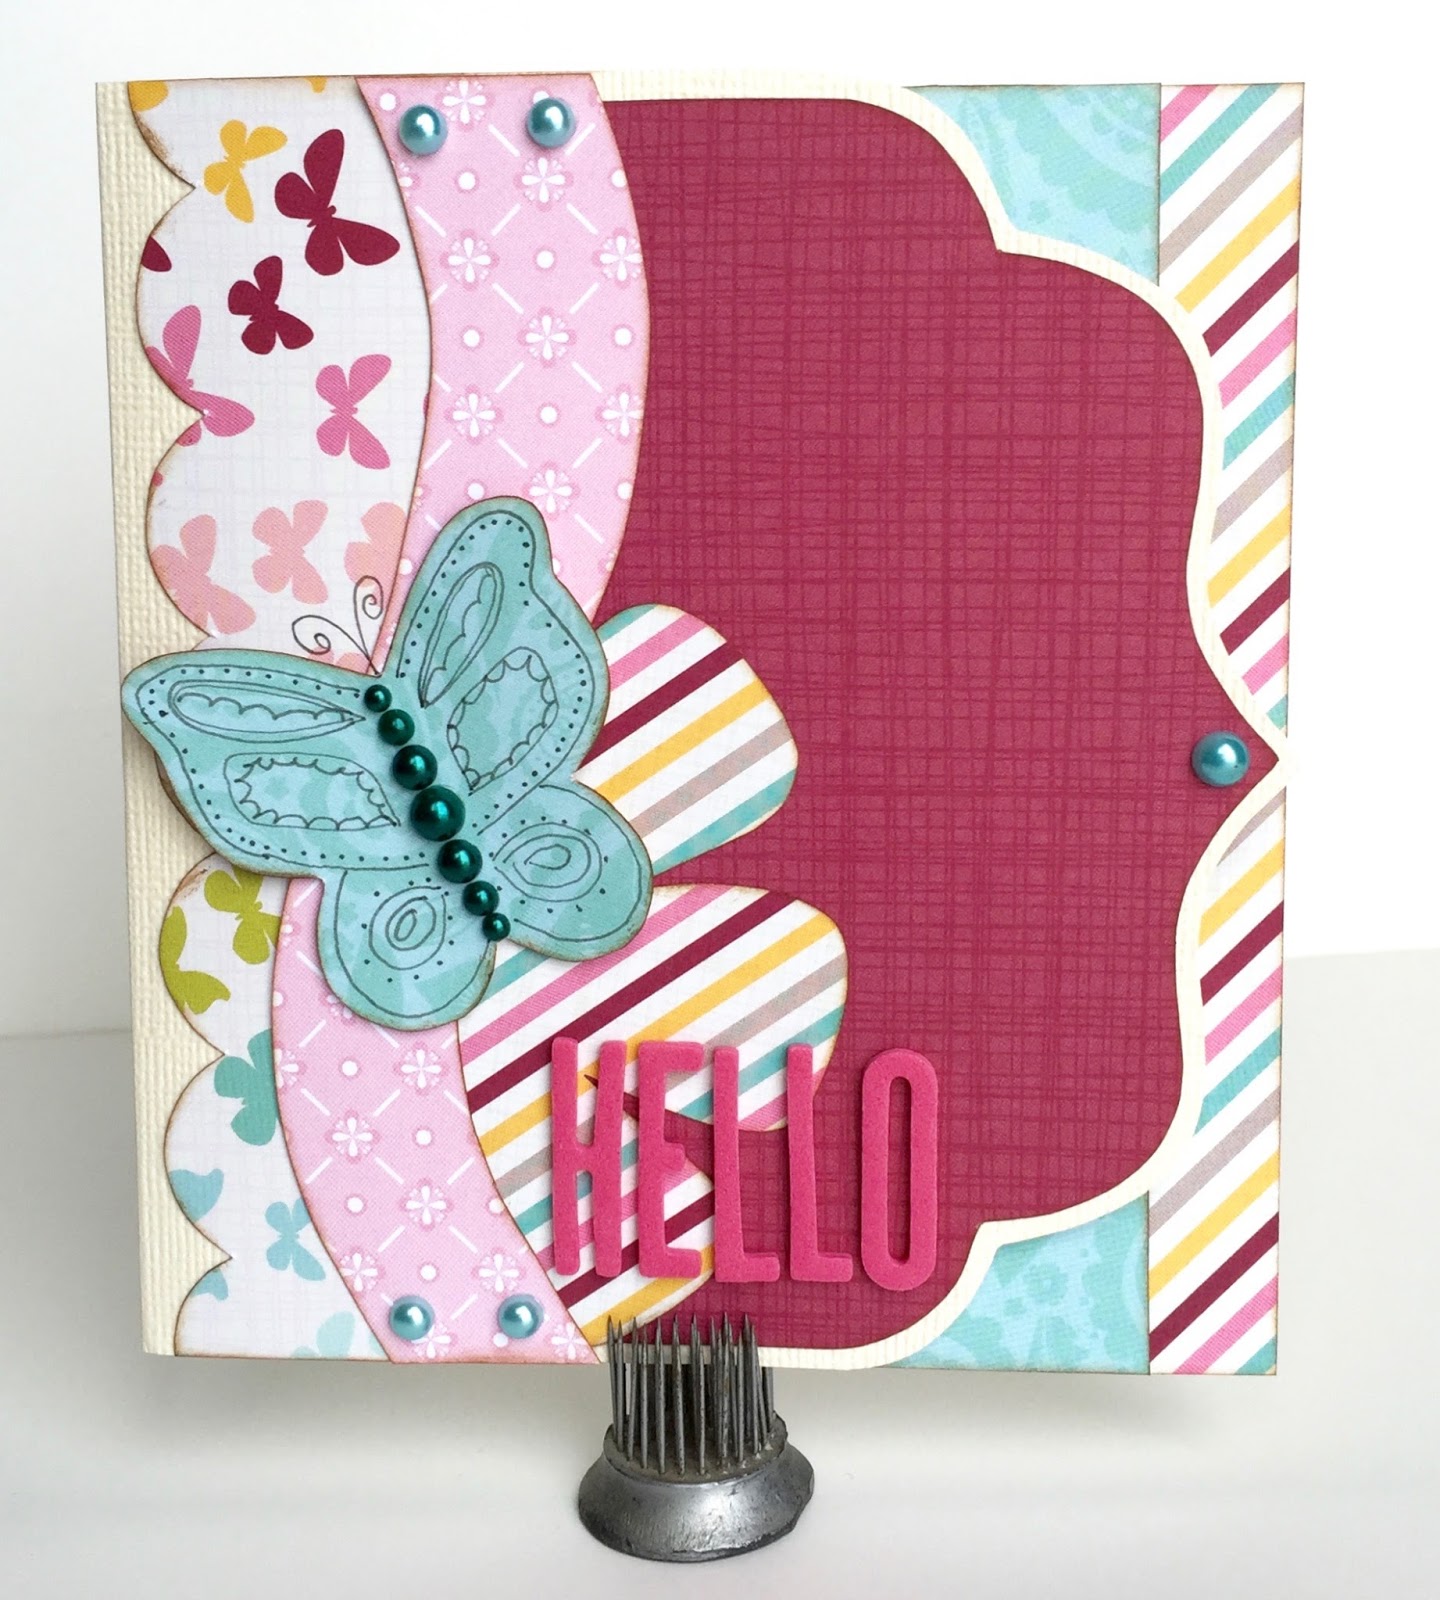
Supplies: Kiwi Lane's Social Butterfly paper kit; card stock, alphabet stickers (American Crafts); pearls (Doodlebug); ink (Ranger); pen (Staedtler)


The "Hello" card has a shaped edge and some detail on the inside:


Even after making a layout and a few cards, I have enough scraps of paper left to make at least a few more cards. I love how much you can do with each Kiwi Lane paper kit!

Thanks for stopping by and Happy Scrapping!!

Templates used:
Bracket 2
Adorn 3A,3B,1B
Tiny Nature 2T
Scallops 1B
Wildflower 1T,4T
Autumn 1,3,6
Springtime 2
Mini Scallops 2A

Friday, October 9, 2015

Shaped Cards for Fall with Kiwi Lane

Happy Fall, Y'all!!  Fall is definitely my favorite season and I'm happy to share some fall and Halloween themed cards with you today using my Kiwi Lane Designer Templates.  

As you may have heard, this month's featured sets are Halloween and Tiny Holiday.  These sets go hand in hand and work so well together!  I love that the Tiny Holiday template set has all the tiny versions of shapes from Christmas, Halloween and Winter.  Whether you're a card maker or a scrapbooker, these sets should be in your stash!  If you happen to be a card maker, you probably just read that and thought, "Huh?  Why do I need to have the large holiday sets?"  Well, to make your card base, of course!  Let me show you what I mean.

First off, here are the cards I made:


   Supplies: cardstock (American Crafts, Georgia-Pacific); patterned paper (Studio Calico); brad and sticker (Doodlebug); glitter glue (Ranger); ink (Ranger, Superior); enamel dots (SEI); embossing folder (Darice); jewels, button, wire, stamps (craft supply).

You'll notice they are not your typical square or rectangular cards.  They're shaped cards and so easy using your templates!  First step- grab a manilla folder and some templates from the Halloween template set.  Leaving some of the template hanging off the folded side of the manilla folder, trace your template.  It should look something like this:


Now cut out your shapes.  Leaving some of the template hanging over the edge when you trace and cut makes the shape a card, like this:


Grab the templates you used to cut your card base and start planning your card.  Layer with smaller templates and make sure the majority of the smaller templates are on top of the larger one and not hanging too far off to ensure your card layers are strong and will adhere together.  Here are my "Framed" cards:


Now trace, cut and decorate your cards and you're ready to give away some gorgeous shaped cards that were easy to do with your Kiwi Lane templates!

Thanks for stopping by and Happy Crafting!!

Templates used:
Halloween 1,2,4
Tiny Holiday 2,4,5
Autumn 1

Tuesday, October 6, 2015

Stacked Halloween Blocks (Inspired by Pinterest)

So I've recently been put in charge of a crafting group in my area.  Which is all fine and dandy when you consider I have an extensive knowledge of paper crafting.  But this group thing is kind of throwing me for a loop.  Why?  I asked for input as to what the group wanted to make, and NOTHING was paper crafting.  It was wood... and paint... and metalwork... and other scary things!  But, I decided to jump in with both feet and branch out of my paper world.

One of the projects shared was this:
It was shared from Pinterest. This looked fairly do-able and I decided to take a shot at it.  Here's what my stacked Halloween blocks ended up looking like:
Just a bit different from the original idea, right? ;)  I had no idea what the block on the bottom was- a scarecrow? A witch?  And I wasn't too thrilled with the idea of having two green blocks, so I turned the scarecrow/witch block into a pumpkin and switched places with the monster guy.  I also wanted the eyes to have more personality, since they are the only part of the face.  I have no idea what size blocks were used for the original, so I just did what I thought would be easy- I chopped up a 4x4 into cubes.  Actually, it was a 3.5x3.5.  I had enough people sign up to do the craft that I ended up doing about 25 sets.  Lots of cutting and sanding.

So, lets go through the stack and I'll let you know what I did.

Pumpkin block:
Painted it orange, traced and cut a burlap leaf from the Kiwi Lane Designs Tiny Nature template set, painted a spool with a layer of brown followed by a layer of bright green on top, made a vine out of twine and painted eyes on the front of the pumpkin.  Hot glued the leaf, stem/spool and vine/wire to the top of the block like this:

Mummy block:
Painted a layer of white followed by a layer of cream (Why? Because 2 layers of cream looked to yellow and 2 layers of white looked too bright.), painted eyes, wrapped around a 2-3" strip of gauzy fabric and tied in a knot on the side above the eyes.

Monster block:
Painted it green, spray painted wooden push pins silver, cut hair out of paper and glued to the top of the block as hair, painted eyes and scar.  I used paper because I could not find any black felt in our town ANYWHERE!!  And I looked everywhere I could think of.  But, if you use paper, don't use hot glue!! I did and it has warped the paper and looks awful! I think I'll be replacing it with felt as soon as I can find some again.  Anyone want to send me some? ;)

I sanded the edges of all the blocks for a slightly distressed look (and to help cover up any painting mistakes- sanding makes it look messy on purpose!)  The finished product ended up being about 12" tall, including the spool/stem.

And there you have it!  My first soiree into the world of wood crafting!  Maybe not the first, but I don't think I've done anything in that department for a few decades.  Is there such a thing as a born again wood crafter?  If so, I think I'm in that category! ;)  I really liked playing with paint and blocks. I think I might even do it again!

Thanks for stopping by and Happy Crafting!!

Wednesday, September 9, 2015

New Layout Using Kiwi Lane's "Birds of a Feather" Paper Kit

Hey Kiwi Peeps!  Last month I shared a layout and card using on of the new Kiwi Lane Designs paper collections.  Well, it might be a bit like a rerun, but today I also have a layout and a card using one of the new Kiwi Lane Designs paper collections.  This time, I decided to use the "Birds of a Feather" collection. I love the muted peach, yellow, green and blue paired with a brighter coral along with charcoal and white.  This mix of bold and pastel colors were just asking to be paired with some photos I had from a family field trip to Wheeler Farm in Utah.  Here's the layout I came up with:


I'm kind of loving the muted tones for the pumpkins and leaves.  It really pops against the bolder papers.  And if I haven't mentioned it before, there is a sheet of printed cards and smaller bits of printed patterns in each collection to give you a variety of options when building your page.  For example, I was able to use the peach for a few things, but it was just a small area printed on one sheet of paper.  In fact, I was able to cut the pumpkins, tree trunk, tree top, bracket, flower and tag (behind the title) all out of the same piece of paper (using both front and back).  Plus the butterfly, flower and sentiment/quote on the card.  Talk about getting your money's worth!  And speaking of cards....


This was made using the same "Birds of a Feather" collection, but this time I steered clear of the bolder colors.  Now, instead of having a bold autumn feeling, the paper has a softer spring-like feel.  I also added some sparkle.  Because I just couldn't resist! ;)  I used some glitter glue to edge the butterfly and some iridescent Smooch top coat on the edges of the flower and the leaves.  Kind of hard to see in photos, but here it is-


I love how versatile this paper collection is!  Thanks for stopping by and happy scrapping!

Templates used:

Layout:
Madison Avenue 2A,2B
Aspen Court 3A,3B
Nature 1,4
Halloween 2
Tags 1
Tiny Accents 1T
Tiny Nature 1T,4T,6T
Tiny Holiday 2T,4T
Tiny Brackets 4T

Card:
Tiny Nature 1T,2T,6T

Saturday, August 22, 2015

New "Live Life" Paper Kit with Kiwi Lane

Hey Kiwi Lane friends!  Have you been dying over the new Kiwi Lane paper lines, too?  I think I'm in love with all of them!!  So, to show how great they are, I've made a 2 page layout and a card to share with you today.  Both were made using the new "Live Life" collection from Kiwi Lane.  

Here's the "Framing" of my layout:


And my completed layout:


While I was making my layout, I noticed some black dashed lines along one of the printed strips that I was using.  And what goes well with a little bit of black printed on paper?  Doodling!  For my tree, I took the Tiny Nature 6T shape and doodled along the edges.  I knew I would be stacking it on the Nature 6 shape and the doodling (along with a few foam adhesive dots between the layers) help set apart the layers and add depth without a lot of bulk.  


And, of course, I had to add a little bit more doodling so I did a simple outline around the Tiny Bracket shapes for journaling, the tree trunk and the leaves of the dragonflies.  A simple addition that adds so much.  And remember- doodling doesn't have to be perfect.  The imperfections add to the charm. :)


And what do we do with our leftovers?  Make a card, of course!

The printed card is part of the Kiwi Lane "Live Life" paper collection.  I used a few templates from the Elements template set to mimic the printing on the card for a simple card.

And that's it for today!  If you, too, couldn't resist those super cute Kiwi Lane paper collections, I'd love to see what you made with yours!  Feel free to share them to Kiwi Lane's Facebook page or blog.  Or you can share the link in the comment section of this blog post.  Can't wait to see!

Templates used:
Journey 1,6
Rings 1,2,3,4
Nature 6
Tiny Nature 6T
Playtime 4
Tiny Explore 1T
Tiny Brackets 1T,2T
Paisley Place 3A,3B
12" Strips

Thanks for stopping by and happy scrapping!

Monday, June 22, 2015

Family Fun Layout

Well, if you follow Kiwi Lane's blog at all, you'll have already seen this layout.  Because, well, I'm late in posting.  Again.  I feel like I should be saying "as usual" at this point.  Sigh.  The reason for my tardiness this month?  I was on vacation with my kids!  Yep, I took my kids and drove a few thousand miles and went to visit my sister and her family in the Madison, Wisconsin area.  We spent two weeks covering lots and lots of freeway, playing with family, seeing some sights and doing a little bit of nothing.  It was fun, but I'm glad to be home.  And don't worry.  There are plenty of photos from that trip for me to scrapbook.  And, who knows? Maybe they'll even make it onto a page sooner rather than later.... yeah.  Right!  :)

So here's what I made using my Kiwi Lane templates:
Supplies:  patterned paper, brads, printed chipboard, enamel dots (My Mind's Eye); alphabet stickers (Pebbles); ink (Ranger); pen (Staedtler)

And here's how I framed my layout with my Kiwi Lane templates:

Honestly, there's nothing super special about this layout.  No tips or tricks that I can think of.  If you can see any, let me know. ;)  

Templates:
Cascade Trails 1A, 1B, 3A, 3B
Adventure 1, 2, 3, 4, 6
Tiny Explore 4T
Tiny Accents 3T
Tiny Wacky 1T
Photos

Thanks for stopping by and Happy Scrapping!

Wednesday, May 13, 2015

S'mores Day 2 Page Layout using Kiwi Lane Design Templates

(Sorry this is posted late- I had it scheduled for next month, for some unknown reason...)

Hello!
I have a 2 page layout to share today.  
Supplies: cardstock (American Crafts, WRMK); patterned paper (Simple Stories); letter/number stickers (American Crafts); brads (Doodlebug, WRMK, Basic Grey); pen (Staedtler); ink (Ranger)

When I was putting my supplies together for this layout, I chose this patterned paper by default.  It was the only collection on my table that had colors that wouldn't clash with the clothing in the photos.  I hate to admit it, but there it is.  Sometimes proximity and color play a rather large part in my paper choice.  This particular collection gave me a few issues that I needed to find solutions for, though.  First- I didn't have very much patterned paper to work with.  I'd already used the collection on a layout, so I had 2 sheets of pocket page style cards and 3 pieces of patterned paper that had half used or more on each sheet.  Second- The theme of the collection is summer/beach/vacation.  So how did I come up with a 2 page layout with the aforementioned problems?  Here it is...

For the issue with paper amount, I added solid card stock to the mix.  The collection was full of bright, bold color so that limited options to light colored or white card stock for the background.  Since part of my patterned paper was yellow (and I knew I wanted to use it for layering), that meant I'd use white for the background. Decision made!  Easy peasy.  I also used a solid green card stock with the chevron border along the bottom of the layout for a bit more depth.  Because the patterned paper is so bold, I chose to keep my embellishments simple.  I used a few layers of my Kiwi Lane Designs Wildflowers, Tiny Wildflowers, Tags and Tiny Tags Accessories for most of the embellishments.  I also used a 3x4 card to fill some space with a title.  And I used a black pen to outline many of the accessory shapes. This adds a bit more dimension without bulk.  The final touch was adding some brads to the tag shapes and the small chevron on the left page.  I added small brads that are the same color as the paper on the chevron.  This is another technique to add some dimension and interest to a simple shape without adding a lot of bulk.


What did I do about that summertime theme?  Well, you know those sheets of pocket page cards?  I used those to mat my photos, adding more color to the layout and covering the theme that didn't apply to my photos.  I cut my photos 1/4" smaller than the cards for the perfect thin mat.

That's it for this layout!  I hope you fell inspired to use those scraps up on more than just cards, and use those pocket page cards on more than just pocket pages!

Thanks for stopping by and Happy Scrapping!

Template list:
Chevrons 1A, 1B, 2A, 2B
Mini Colter Trails 1A
Tiny Tags 3T, 5T, 7T
Tags 1, 2
Tiny Wildflower 2T, 5T
Wildflower 1, 2

Friday, January 23, 2015

A Winner... better late than never.

I totally spaced announcing the winner of the Tiny Celebrate Template set... D'oh!!  Classic example of Mom-nesia. Sorry!   If you've been waiting on the edge of your seat, I'm here to finally put you at ease!  Annnnnnddd the winner is:

goffy28


If this is you, please shoot me an email at glo_owens(at)msn(dot)com with your mailing address and I'll get your new templates sent out to you.  (You have until Friday Jan. 30, 2015 at 11:59 pm MST to claim your prize)

Thanks for playing and have a Scraptastic day!

Tuesday, January 13, 2015

Birthday Calendar with Kiwi Lane plus a GIVEAWAY!!

As I was looking through my craft supplies and considering what I'd be making for my project this month, my eyes settled on a frame that'd been sitting on my desk for a little while.  It's one of those TOLSBY frames from IKEA that you can pick up for 99 cents and it looks like this: 


You can get them in a few different colors, but I opted to pick up a few white ones to have on hand.  You could also paint them with spray paint, from what I understand, although I haven't tried it.

When I purchased the frame, I had a few projects in mind.  One of them was a flip calendar to organize important family dates like birthdays and anniversaries.  And what better way to kick off the new year than to be a little more organized!  So, I grabbed a few basic supplies along with my Kiwi Lane Designs templates and got to work making my calendar.  And this is what I came up with:

Each page is made with a lightweight chipboard that has been covered with pretty paper.  If you don't have any chipboard on hand, a cereal box works as a great alternative.

I used a few of the Tags templates.  I did have to trim off about 1/4" to make them the right size to fit in the frame.  Here are a few pages:


And, of course, you have to make the back pretty, too.  ;)  I used some scraps and a scallop template to add layers.


I finished up by decorating the base of the frame with a few flowers.

The whole project was fairly easy and was pretty fast.  It would be a great Saturday project!  And a cute way to start your year with a bit of organization!  

Enter to win this set of Tiny Celebrate Templates!!

And what's better than a new project for the new year??  New supplies!! How would you like to win a set of templates to start your year off right?  Well, just leave me a comment telling me what project you are working on and you will be entered to win a set of Tiny Celebrate templates (like the ones pictured above)!  I'll even give you an extra entry if you start following my blog and let me know in your comment (one comment will work for everything!)  And if you are already a follower of my blog, let me know in your comment. :)  You have until Monday, January 19, 2015 at 11:59 p.m. MST to leave your comment.  I'll randomly choose a comment and announce it on Wednesday, January 21st.

Thanks for stopping by and Happy Scrapping!!

Template list:
Tags 5, 6, 7
Adorn 3A, 3B, 1A, 1B
Tiny Accents 1T, 2T
Tiny Celebrate 4T
Tiny Shapes 3T, 7T
Tiny Tags 1T
Delight 1, 2
Tiny Brackets 2T
Tiny Nature 1T

Supplies:
Patterned paper- Simple Stories
Burlap paper- DCWV
Chipboard alphabet stickers, gray card stock alphabet stickers- American Crafts
Glitter alphabet stickers- Making Memories
Green card stock alphabet stickers- Scenic Route
Eyelets- WRMK
Small epoxy dots- Teresa Collins
Flower punch- EK Success
Ink- Ranger
Circle Punch- Marvy Uchida
Ribbon- Fancy Pants, Pebbles, AMM, May Arts, Polar Bear Press, Personal Sentiments

Monday, January 12, 2015

Midweek Mojo Petunia 7

I was able to get my version of Petunia 7 done this week... and on time!!  Hallelujah! ;)  Haha!  In all reality, I love doing weekly layouts of the sketches at ScrapbookSteals.com.  Even if I don't always get them done on time to enter the weekly drawing.  This is the original sketch (done by the awesomely talented Melissa Denhe):


And here's what I came up with:
 I used Dear Lizzy's Neapolitan collection and a few other coordinating embellishments from American Crafts, along with my ever-present Kiwi Lane Designs templates.  Did you know that Kiwi Lane release 3 new sets of templates this week?? Well, they did!  I used one of the sets for this layout, but you can go HERE to see all three sets... and maybe order your own, if you'd like. :)

Here are a few close up shots of my embellishments:

Thanks for stopping by today, and Happy Scrapping!!  Stop by tomorrow for a great Kiwi Lane project and a Giveaway!!

Templates: 
Elements 2, 5, 6, 7, 8
Cedar Trails 2A & 2B